third Nine Weeks
project 1
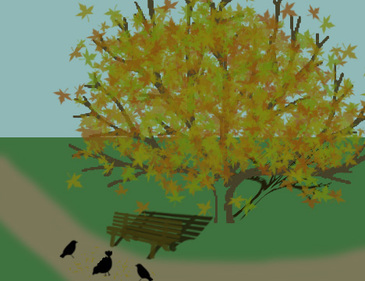
How I made this:
1.Make a stamp by using the pencil select tool around a tree clip art and using that in Edit+ Define Brush Presets in a blank page.
2. Press Ctrl+J and delete every layer besides the tree layer.
3. In a new page, make a landscape by using the rectangle select tool and control backspace for the sky and also one for the ground. Then use a brush for the sidewalk.
3. Make a stamp of a bench to put besides the tree using the same method as in Step 1.
4.Make copies of the tree and bench in a darker color, then flip the tree horizontally by going to Edit+Transform and use skew on both to make them look like shadows.
5.Use brush presets and made birds, transforming one horizontally to make it face the opposite side.
6. With the paint tool, select the maple leaf tool and but the opacity on 75%. Paint this all over the tree branches.
project 2

How I made this:
1. Make a new layer for the grass, using the rectangular marquee tool the are that should be green
2. On that layer, put a 60% opacity grass in brown
3. On another layer, use the rectangular marquee tool and make a small strip of dark orange
4. Right above that one, use a yellow-ish orange and so on and so on, using the colors in order of dark orange, yellow-ish orange, yellow, light green, green-ish blue, and dark blue
5. With the smudge tool, blend the colors together to make it look like a sunset.
6.Make a new layer and use the elliptical marquee tool to make the sun. Move this to be 75% shown between the grass and sky.
7. Move this layer so that it is between the grass and sunset, under the grass layer but above the sunset layer.
8. Find an image of an artist in black.
9. In another photoshop page, use the pencil select tool to select only the artist.
Ctrl+J that and the delete all other layers.
10. Go to Edit+Define Brush Presets to create a stamp of that.
11. Back on the sunset page, put the stamp in the bottom left corner.
12. Make a new layer and use a dark blue paint brush, large enough to cover the entire image.
13. Make the opacity around 10% and click on the entire image.
14. click the eyeball under layers
15. Make another layer and do the same thing, except use the brush with an opacity of around twenty to thirty.
16. Hide this layer as well
12. Click Windows+ Animation and add another clip
13. Move the sun to about halfway and add the 10% opacity layer.
14. Make another clip and move the sun completely behind the grass. Hide the 10% percent layer and show the 20-305 percent layer.
15. Click on the first clip and press tweening and set it to five.
16. Do this with the original second clip and original third.
17. Press play.
