Portfolio 1
For this gif, I recreated a Mario image and created some of the background and the numbers to change and move them along with Mario, the question mark block, and the numbers with Animation.
How to make this gif:
Base Image:
Make a 6.5 inch width and 5 inch high blank image. On Google, look up "Super Mario Brothers" and save the fourth picture. Open this in Photoshop. Using the eye-dropper tool and the left-hand side, select the sky. Minimize this image and click on the tab for the original. This color should be in one of the two swatches. Reverse the two with the arrows above them to make the blue as the one on the right. Click Ctrl+Backspace. Go to the Super Mario Brothers image and use the rectangular marquee tool (second tool on the left) and select the bricks Mario is walking on. Press Ctrl-C. Go to the blue image, create a new layer (Ctrl+N), and press Ctrl-V. Move this to the bottom of the screen and press Ctrl+T. Hold shift and adjust it to the right size to cover the entire lower eight of the image. Once that's done, use the eyedropper on the far left bush and get the light green color. Go back to your creation and use the pen tool to draw out the the shape of the bush. Create a new layer and drag it so that it's below the brick pathway in the layer tab. Right click the completed pen path and click stroke image and pencil on the down bar. Then right click it again and choose fill and on the down bar click the "foreground color". Right click the path again and click "delete path". Go back to the Super Mario Brothers image and use the eyedropper tool on the green mound next to the bush and do the same steps that you did for the bush. After that, use the Rectangular Marquee tool and create the middle dark line on the mound. Right click the selected area and click fill and Black. Before pressing enter, set the opacity to 65%. After press Ctrl-D and make the second rectangle. Do the same thing except change the opacity to 75% this time. Using the Pen Tool, create the second bush using the same color as on the Base Image. Add a stroke to this one as well. Once this is done, go on Google and look up "8-bit Mario." I used the first one that came up and saved it. In Photoshop, use the pencil tool and selected Mario, pressed Ctrl-C and went back to my creation. There, I made a new layer and pressed Ctrl-V. Press the eyeball on Mario's layer to hide him for now. To re-create the bricks that Mario will hit, go to the base Image and use the pencil tool to cut out all of the first brick. Press Ctrl-C and go back to your image. Create a new layer. Press Ctrl-V and then Ctrl-T. Holding shift, drag out the side bar to make it roughly 3/4 the height of the dark green mound and click enter. Do this for all of the bricks and set them up side by side. title each brick. Right click each layer to say merge down except for the question mark brick. Make sure it stays on its own layer. After this, we will start to make the tube on the right. Do the exact same thing as the bricks, and name its individual layer to distinguish it. To speed things up, use the rectangular marquee tool and select the clouds and text and press Ctrl-C on the base image. Go to your image and press Ctrl-V. Ctrl-T to make the size similar to the original. We will not do include the 1000 directly above the bricks. Move Mario to the very top of all of the layers except the green tube. Next, go on Google and look up "Mario 8-bit Coin" and select the 13th image and save it. With the pencil tool, select it and copy it into your image. Make it about a quarter the size of the question mark coin. Put this layer and the question mark layer above Mario's layer as well. Make sure the coin layer is underneath the question mark brick layer. On a new layer, use the eyedropper tool on the white numbers and another on the blue background and, carefully, sculpt the six into a five. Hide this layer and make another. Use this to turn the six into a four. With the pencil tool again, make separate layers for each number 3, 2, and 1 already on the screen and use them to put over the six. This will be for the countdown in the gif. Now we can begin the animation.
Animation:
Click Window+Animation. In between each new slide press the small post-it-note looking icon next to the trashcan in the Animation bar. It does not matter how many slides you do in between each movement. Make a new slide and drag Mario to further right, right before the question mark box. Continue doing this until he is underneath the box. Click to show the number 5 over the six to make the time go down. At that point, the new slide should have him moving straight up. Make new slides until he is there and touching the box. Once he is, move the question mark box up to show the coin. Have the box touch the top ends of its neighboring boxes with its bottom edges. As mario comes back down, have the coin follow him down. At the same time, move the question mark box down. Once he touches the ground, hide the 5 and unhide the 4. The coin should touch Mario and then hide it in the next slide. Unhide the 2 for the coins. With the box in its original place, move Mario about halfway to the green tube and hide the four and unhide the 3. Once he has jumped ontop of the tube, hide the 3 and unhide the 2. Lower him into the tube, and make sure that his layer is below the tube's. As he touches the bottom, hide the 2 and unhide the 1. Once he has touched the ground, hide his layer. The animation should be choppy, so use the tweening button on the animation tab to smooth it out. Try to use around 2. If it still looks choppy, add more
2
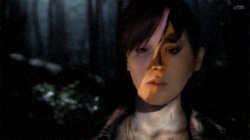
This is Jodie Holmes from Beyond Two Souls with several of her faces from different points in her life on the Beyond Two Souls wallpaper. There is a filter on top of that.
To make this image, save the image from this link and open it into photoshop. http://8tracks.imgix.net/i/000/827/322/jodie-holmes-beyond-two-souls-21027-1920x1080-5264.jpg?q=65&sharp=15&vib=10&fm=jpg&fit=crop
Next, copy this image from this image into photoshop. With the pencil tool, select Jodie's face on the copied image and her hair and press Ctrl+J. Delete the original image so that you just have her head. With Ctrl+T, adjust the head so it's the same size as the base image's head and move it to the side. Next, get the eraser tool and erase diagonally from the beginning of her left bangs to a little vertically below of her tearduct in a straight line. Put this ontop of the base image where this is on her head. next, copy the link into google and copy the image into photoshop.
http://www.blogcdn.com/www.joystiq.com/media/2013/06/beyond-06.jpg
Do the exact same thing as before but erase to get a strip that goes diagonally from half of her mouth to the majority of her eye to all of her nose to vertically below of her tear duct. Next. copy this image in to Photoshop and do the same thing.
http://4.bp.blogspot.com/-9WNH62UaToQ/Uq_R_IUH4aI/AAAAAAAAHa4/0qvJg8Di1cc/s1600/Punk-jodie.jpg
This time, erase from the middle of her chin diagonally to the last 1/6 of her head on the left. Go to filter+ Watercolor and make a filter on top.
3
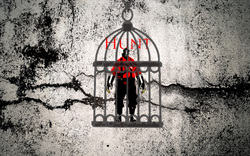
This is a wallpaper, downloaded birdcage, and a posterized pryo from TF2 with the word "hunt" typed in the birdcage. A filter is applied on top of that.
First, save the image in this link and open it in photoshop.
http://wallpaperswide.com/crack_2-wallpapers.html
Next, copy this image in the link below with Ctrl+C and paste it into photoshop with Ctrl+v.
http://4.bp.blogspot.com/-N7FDpDWY43Q/UIXLTb6G2vI/AAAAAAAAA0M/vbagFQSqukg/s400/images-7.jpg
With the Select+color range clicked, use the eydropped given to select just the gray birdcage and then click ok. Press Ctrl+J and delete the first image. But the birdcage in the middle of the base image. With Black in the background and grey (R=75, G=75, B=75) on the color palette, go to filter+ Sketch+ Chalk and Charcoal and use the default given. Then, click on the layer with the background and go to filter+Artistic+fresco and use the default. Then copy the image below into photoshop.
http://rocket.keystoneschool.org/access/web?id=d5d04e68-d170-11e3-aa05-00e0ed2c9fbc
With the pencil tool, go overand select only the pyro and click Ctrl+J. Delete the original image so you just have a layer with the pyro. put it ontop of the birdcage. Go to Image+Adjustments+Posterize and set it to number 3. After, drag the pyro's layer so that it's underneath the birdcage. Set the birdcage's opacity to 75%. Then, select the text tool and, with Times New Roman, type the word "HUNT." Then make the text box as small as you can with the word still visible and press the check mark at the top left. Press Ctrl+T and make it the size to fit in the bird cage above the pyro. Highlight it and use the eye dropper on the pyro to use that color. Put this layer below the birdcage but above the pyro's layer.
4
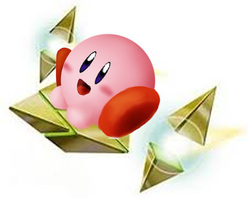
We are going to re-create Kirby from the image below and copy him onto an image of a hovercraft.
http://img3.wikia.nocookie.net/__cb20080719093029/kirby/en/images/a/ae/Blue.jpg
With a blank white Photoshop document on size 6 inches x 5 inches, create medium sized circle with the Elliptical tool. Make a new layer. Click on the background color on the color palette and set it to pink (R=225, G+225, B=225). Hit Ctrl+Backspace to fill the circle. Move the circle from the center slight up and to the right to give space for the hovercraft. With the burn tool on Exposure 50%, shadow the right side of the circle to make it look like a sphere. Use the Dodge tool on Exposure 50% as well to highlight where Kirby's face is. Use the image in the link for reference. Next, with the pen tool, draw Kirby's left foot. It is a narrow oval slightly bent to the right. With the background palette selected again, select the red color (R=211, G=48, and B=13). Press right click the selection and press fill+ background color. Right click it again and right click the foot+ Delete vector mask. Once you have made the shape, use ctrl+T to make it the proper size. Once again, use the original image, the burn tool, and the dodge tool to make the shadows and highlights. Next, create Kirby's right foot with the pen tool. Fill the the same way as with the other foot. Use the burn tool to shadow it like in the foot on the original image. to make Kirby's right hand, use the original color of pink and fill a small circle. Put this layer below the large circle's layer but above the right foot's layer. Use the burn and dodge tools to create a sphere-like appearance. for Kirby's left foot, make the circle on the layer with the large circle and shadow it. Then, with the smudge tool, blend the body and hand together to make it look seamless. With the burn tool on 50%, burn on the sides of the pink sphere where the blush is before we continue with the rest of the face. With the elliptical tool on a new layer, create an oval the size of Kirby's eye and fill with with black using the Ctrl+Backspace tool. With the Edit+transform+Distort tool, bend the eye so that it looks as if its curving over the sphere. Then, with a size 1 paintbrush with the color R=57, G=18, and B=135, create an crescent shape on the bottom half of Kirby's eye and a white circle on the top. Press Ctrl+J and transform the new layer with Edit+ transform+rotate Horizontal. with Ctrl+t, rotate the eye so it is parallel to the other eye. On a new layer for the mouth, use the foreground color as R=123, G=30, and B=30. With the pen tool, make the mouth and fill it with that color. Move this to the bottom left corner of the right eye. With the color R= 204, G= 56, and B= 34 to make the bottom part of his tongue. With the burn tool, slowly intensify the darkness inwards to make it look three dimensional. To make the background, copy the image from this link into the photoshop page.
https://www.google.com/search?q=kirby+air+ride&es_sm=122&source=lnms&tbm=isch&sa=X&ei=vvZnU-WXNIquyAStioCwCg&ved=0CAoQ_AUoAw&biw=1024&bih=643#q=kirby%20air%20ride%20stars&revid=2097552141&tbm=isch&facrc=_&imgdii=_&imgrc=lxQDiExriTlQzM%253A%3B8qeHS44bAAn6_M%3Bhttp%253A%252F%252Fquizilla.teennick.com%252Fuser_images%252FP%252FPR%252FPR.%252FPR.FLAREMA%252F1214246573_9393_full.jpeg%3Bhttp%253A%252F%252Fquizilla.teennick.com%252Fpolls%252F7382179%252Fwhich-kirby-air-ride-star-do-you-prefer%3B284%3B238
Move its layer to the very bottom and click Ctrl+T to fit it onto the screen. Rotate Kirby with Ctrl+T and move him so it looks like he's riding on the star. That's it.
5
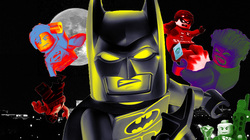
We are going to put a custom gradient maps on each of the heros from this Lego Batman videogame. You select them with the pencil tool and use the eyedropper tool to use the signature colors from each superhero.
To make this project, save the image in this link below and open it in Photoshop.
http://nintendookie.files.wordpress.com/2013/02/lego-batman-2-wii-u.jpg
With the pencil tool, select around batman and press Ctrl+j. Then, go to Image+Adjustments+ Gradient Map. Select the first black and white gradient. In the options, right click in the middle of the black and white and click color. Set the color to R=227, G=225, and B= 22. Press OK. Back on the base image's layer, select superman with the pencil tool and press Ctrl+J. Go to Image+ Adjustments+ Gradient Map. Click on the 6th gradient and click on the purple. Instead of this purple, change it to R= 92, G= 149, and B= 213. Press OK. Go back and do the same selection process to the man Superman is holding. Then go to the gradient map and do the same thing as Batman but divide the black into four even sections. The first in the black, the next is a blood red color, and then any off-white color, and lastly the white. With Robin in the background, select him the same way and do the same thing as Batman but change the black to the R=230, G=0, and B=0. The middle color will be black and the last color stays white. For The Joker, select and seperate him like the others and go to the options on Superman's gradient template. Instead of changing the purple to blue, change it to the color R= 58, G= 85, and B=43. The middle color should be R= 58, G= 45, and B= 86. The final color should be the most intense red. Lastly, change the final person with the Batman's kind of gradient map. Switch the black to R= 29, G= 91, and B= 17, and the middle color to black. Delete the base image so all that's left is the gradient filled characters. Copy the image from this link and with Ctrl+T adjust it so that the moon and most of the skyline fit into the screen. That's it
http://4.bp.blogspot.com/_eK23SXU8fS8/TQA7uAsdxqI/AAAAAAAABtI/XJdZnf5aT4M/s1600/Moon%2BOver%2BDC%2B22NOV2010_edited-1.jpg
6
I created two portals with the eliptical tool, smudge, dodge, and burn and copied Atlas from Portal to make this gif. Then we use a gradient to make the background.
With the elliptical tool, create a narrow oval and fill it with any color. Go to Layer+ Layer styles and go to stroke. Make a stroke with the color R=255, G= 124, B=0 and make the stroke size 4. Press OK. go to Select+ Color Range and select the orange color. Press Ctrl+ J and delete the original oval layer so you just have the orange ring. With the burn tool on 50%, darken the inner edge of the oval. next, with smudge on 75%, create flame-like strings curving inward, creating the portal. To create the blue ring on a new layer, do the exact same thing, but sue the blue color R=28, G=144, and G= 124. Move it directly underneath the orange one with the bottom edge touching the edge of the image. With this link, copy it into the image and use Ctrl+T to make it take up the entire page.
http://www.pxleyes.com/images/tutorials/submissionsteps/fullsize/1349_step1_4a929c435d06a.jpg
Move it's layer to the very bottom. Next, with the eliptical tool, select the inside of the blue ring and Ctrl+J on its layer. Move that to the orange portal's layer and merge it with the orange layer. Next, copy this image from this link into the image and put it on the very top of all of the layers.
http://img4.wikia.nocookie.net/__cb20130307200830/playstationallstarsbattleroyale/images/0/04/Atlas.png
Next, with the rectangular marquee tool, select a section of Atlas (about a tenth). Control+J this onto a new layer. Whatever you didn't select of Atlas select now and put it into a new layer. Name the feet section "Feet 1" and the rest of the body "Atlas 1." Do this so you have 10 divided pieces of Atlas, all gradually with more feet and less body until you have the entire body in the feet selection. Label all of them this way. Next, go to Windows+ Animation and hide all the layers except the "Original Atlas." have Atlas inbewteen the orange and blue portals. Make a new slide and have Atlas move down further towards the blue one. One he is about halfway on the third slide, hide the original Atlas. Unhide Atlas 1 and Feet 1 and move them so that the feet are sticking out of the orange portal, or seemingly so. Move Atlas 1 so that it looks like he is falling into the portal. Inbetween the numbered Atlas pairs, hide the ones that you are no longer using. Do the same thing for all the 10 segmented Atlas layers on new slides, continuing his fall into the blue portal and out of the orange one. Once you read the 10 segments, unhide the original Atlas and move him back to the original position you started in.
7
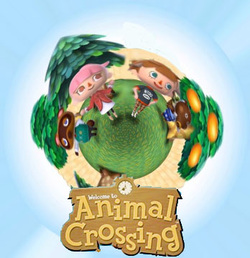
We will use polar coordinates and the pencil tool to create a tiny world from the Animal Crossing wallpaper.
Use this image and open it in Photoshop. Go to Image+Image Size and change both sets of pixels to 360. Go to Edit+ Transform and change rotate it 180 degrees. Then go to filter+ Polar Coordinates and check the rectangular coordinate box. With the eyedropper, burn and dodge tools get rid of the tree behind the boy. Use the next link and copy the image into the photoshop document. With the pencil tool, select the logo and press Ctrl+J. Delete the original image layer. Move this to cover the bottom tree in the center.
http://chrisbradleysblog.files.wordpress.com/2013/07/animal-crossing-new-leaf-tourism-690x388.jpg
http://ecx.images-amazon.com/images/I/51D98VK2RWL._SY300_.jpg
8
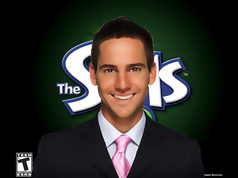
Will will use the smudge, burn, dodge, and a filter to make this man look like a character from the Sims 2 videogame.
Save the image from this link and open it in Photoshop.
http://themify.me/demo/themes/pinshop/files/2012/12/man-in-suit2.jpg
Next, go to Image+Adjustments+Brightness/contrast and change the Brightness to -2 and the Contrast to +8. Next, with the doge tool (for brightness), the burn tool (for shadowing), and the smudge tool, blend all of the rough edges on his face and in his hair to make him look somewhat flawless. It should be somewhat similar to a Sims 2 character. Focus mainly on the circles on his eyes, the stubble on his cheeks, smile lines, and shine marks. With a white color on the paintbrush, color in shine marks on his eyes and enhance the color of his eyes where it has yellowed. With the eyedropper, select skin colors inbetween his eyebrows and color away stray hairs. Once you have done this, go to Filter+Blue+Surface blur and use the default setting. With the pencil tool, select the man and leave out the white of the background and press Ctrl+J. Delete all layers except his. then, copy and paste the image from this link into photoshop and use Ctrl+t so that it covers the entire image. then move the layer below the man.
http://rocket.keystoneschool.org/access/web?id=252e7244-da13-11e3-aa05-00e0ed2c9fbc
9
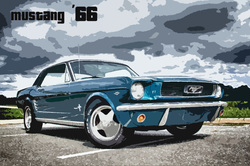
We will use the Cutout filter and the pencil tool to make this 66' Mustang look like it is from the cover of the videogame Grand Theft Auto 5.
To make this, save the image from this link.
www.themusclecarplace.com
Go to filter+Artistic+cutout and set it to your preferences. Go on the internet and find a template of Pricedown font and copy it into Photoshop. Use this link for the template.
http://www.1001fonts.com/pricedown-font.html
with the pencil tool, select the letter and then ctrl+J. Move that new layer to the top left corner and do that with each letter, number, or symbol. You have made a GTA cover with the car.
10
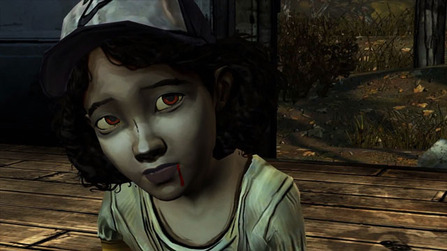
We will use burn, dodge, and smudge tools, layer opacity, Hue/Saturation, and the paint tool to make an ordinary picture of Clementine from the Walk Dead video game into a zombie from the game itself.
Save this image and open it in Photoshop. http://cdn3.voxcdn.com/entry_photo_images/7385893/the_walking_dead_clementine_1020_large_verge_medium_landscape.jpg
Select clementine, leaving out her hair, clothes, and hat. With Hue and Saturation, decrease the saturation as necessary and make her face slightly yellow. Then, with a blood red color on opacity 50%, color over her irises. with any yellow color on the same opacity, select the whites of her eyes. With the burn tool, deepen the hollows of her eyes, her bags, and her cheekbones to make her look sick. With a blueish purple of Opacity 35%, go over her lips. Then, with a blood red color, create a drip mark on the right corner of her mouth down to her chin. Then, with the dodge and burn tools, create a three dimensional effect by following the dimensions of her face. Clementine is now a zombie.
